


Diy-guide-vintage-amplifier-internet-radio-boards
For DIY audio enthusiasts, restoring vintage gear from the '70s and '80s—brands like NAD, Akai, Lafayette, or Arcam—is a labor of love. We spend hours tracking down drifting resistors, matching replacement bias transistors, and simulating power supply ripples in LTSpice. But once the analog power stage is stable, we face a harsh reality: the traditional AM/FM tuner sections are either plagued by static, or the local broadcasting has degenerated into corporate ad loops.
Many audiophiles make the mistake of hooking up a cheap external Bluetooth puck or a noisy consumer streamer. This introduces messy ground loops and ruins the clean, integrated look of a classic rack setup.
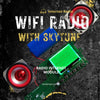
The ultimate engineering solution? Embed a high-fidelity, standalone internet radio diy kit master board directly inside your vintage chassis, hooking it straight into your existing source selector switch.
Pure Analog Integration: The Beauty of R-GND-L Straight-Out
When looking for a digital network streamer module to retrofit into an analog beast, many generic microcontrollers force you to deal with complex digital I2S busses, external DAC alignments, or proprietary control software. For a classic restoration, you want to keep the signal chain as clean and straightforward as possible.
High-quality, engineering-focused internet radio diy kits solve this by handling the digital-to-analog conversion completely onboard. Instead of messy digital debugging, these bare-board modules feature a standard, dedicated R-GND-L (Right, Ground, Left) 3-pin (or more) stereo analog output header right on the PCB layout.
For anyone who knows their way around a soldering iron, this layout is an absolute dream:
-
No External DAC Required: The board outputs a clean, pre-decoded line-level analog audio signal.
-
Seamless Auxiliary Hookup: You simply run two high-quality shielded signal wires and a solid ground reference from the board's R-GND-L header directly onto the unused terminal lugs of your vintage receiver's Aux, Tape, or Tuner input selector.
-
100% App-Free Autonomy: Once configured to your home Wi-Fi and loaded with your favorite web streams, these standalone boards boot up and stream automatically. Your vintage amplifier treats it exactly like a built-in analog component—no clunky smartphone handshakes or app updates required to keep the music flowing.
Power Sub-System Isolation & Thermal Planning
Integrating a digital Wi-Fi bare board inside a heavy steel or aluminum vintage chassis requires basic layout discipline. Digital modules draw fluctuating currents when negotiating network handshakes, which can introduce high-frequency switching hash into sensitive analog gain stages.
To keep your vintage amplifier's noise floor dead silent, keep these build tips in mind:
-
Isolate the Power Sub-System: Never share a regulated analog rail with your phono or preamp stage. Tap a secondary line off your primary transformer and feed it through a dedicated, isolated low-dropout (LDO) linear regulator or a heavily shielded DC-DC buck module.
-
Mind the Faraday Cage: Because a vintage metal enclosure acts as a natural Faraday cage, ensure your chosen internet radio diy kit features an onboard IPEX or U.FL antenna socket. This allows you to easily route a clean external Wi-Fi pigtail antenna to the rear panel of your cabinet for uninterrupted packet streaming.
Keeping the Analog Soul Alive
Don't relegate your classic Akai, NAD, or Lafayette receiver to a dust collector just because traditional broadcasting has faded. By treating a dedicated internet radio bare board as an internal auxiliary source and utilization its direct R-GND-L analog output, you bridge the gap between golden-era analog warmth and global digital access.
Pop your enclosure open, map out your chassis space, heat up your soldering iron, and give your vintage rig the uncompressed web source it deserves.


 Message